a bunch of tips and tricks

KVM VM Image Crash

So, something bad happened! My Virtual Machine running on my NAS crashed.

And it looked like this…

2020-05-08T19:51:09.582896Z qemu-system-x86_64: -drive file=/share/Storage/VM/Windows 10 Enterprise/Windows 10 Enterprise.img,format=qcow2,if=none,id=drive-virtio-disk0,cache=writeback: qcow2: Image is corrupt; cannot be opened read/write

So I did what I normally do, I started googling, and found a bunch of old articles saying that I had to install some “nbd” module in the kernel and then run “ddrescue”, most of the articles I found pointed to one very sad solution, scrap your VM and reinstall, because you’re never getting your data back.

Anyway, all of that seemed pretty old (and sad), and I thought there must be a better way. And guess what, there was!

First I ran a command called “qemu-img” with the command “check”, and It looked like this:

./qemu-img check /share/Storage/VM/Windows\ 10\ Enterprise/Windows\ 10\ Enterprise.img

When that was done it gave this:

<WALL OF TEXT> (list of all errors in the Image), and then a Summary:

2047 errors were found on the image.
Data may be corrupted, or further writes to the image may corrupt it.
17593 leaked clusters were found on the image.
This means waste of disk space, but no harm to data.
802489/4096000 = 19.59% allocated, 4.83% fragmented, 0.00% compressed clusters
Image end offset: 53754200064

I liked the part about “no harm to data”. So I ran the second command that I had found, which was:

./qemu-img check -r all /share/Storage/VM/Windows\ 10\ Enterprise/Windows\ 10\ Enterprise.img

And after that command finished:

The following inconsistencies were found and repaired:
17593 leaked clusters
1024 corruptions
Double checking the fixed image now…
No errors were found on the image.
802489/4096000 = 19.59% allocated, 4.83% fragmented, 0.00% compressed clusters
Image end offset: 53754331136

And that solved it!

Lesson learned: Scheduled Backup of your VM = good thing.

Remove files with Find

Try to remember that the syntax to remove files recursively using Find is:

find . -name "Thumbs.db" -exec rm '{}' \;

HDMI + MacBook = No Network

I’ve always been one of those guys, saying that “why do you need a fancy HDMI-cable, it’s a digital signal, either it works or it doesn’t work, the signal will not be affected by interference in the same way as an analog signal”.

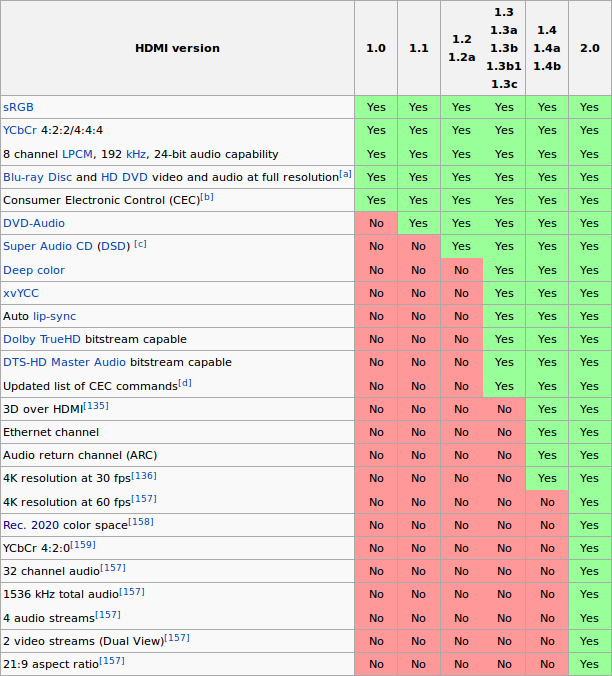
While this is true, a digital connection like HDMI comes with other challenges like, versioning. It turns out (I was aware of this, but have not payed much attention to it in the past), that HDMI has several different versions that all include different new features, and even though the cable and the connection interface looks the same on all products, the actual result of the connection might vary and/or bring different problems with it if there is a missmatch.

I recently experienced this with my new monitor, when I connected it via my HDMI-dock-adapter to my Mac Book Pro, all networking went bananas, I tried turning the monitor off, thinking I had received a unit that was interfering with the Wi-Fi connection on my computer (Bad ESD protection or something, was my first though). But after some researching and tinkering with different cables and input-devices, I figured out that it was actually the HDMI-cable causing the problem.

With a newer HDMI-cable (and not one of the many old-ones I’ve gotten for free with different purchases over the years), everything worked fine!

So if your network connection or other things starts acting up after you connect something new with an HDMI-cable, you might be experiencing the same thing!

What I really think could be improved here, as a consumer, is some kind of error-messaging via a fall-back to a lower version, “Ethernet over HDMI malfunction, because cable does not support HDMI v. 1.4”.

AWS Glacier!

Hard drives will fail!

Manufacturers of hard drives like to boast about “MTBF” (Mean Time Between Failures) and “AFR” (Annualized Failure Rate) rates that indicates that the drive would last anywhere from 300 000 hours (~34 years) to having a likely hood of failing during a year as low as 0,8%.

But real life tests, performed by companies like BackBlaze show that disk drives can fail already after 1 year, actually they had a 5.1% AFR during the first year, 1.4% between 1,5 years to 3 years and a staggering 11.8% between the third and forth year. Their study also shows that after 4 years, it was only 80% of the original disk drives that where still “alive”. Meaning that 20% of the drives had failed after 4 years. 

So, why does this matter?

I have videos, photos and important documents that I need to backup and in some cases archive. Archiving being “removing the local copy and storing the item in a secure place” (think of book keeping, where it’s required to archive the books, it’s not required that you have multiple copies in case of a fire), where as backup is a second copy of the object in another location in case of a fire. We’re talking wedding photos, wedding videos, photos of my son growing up etc. that, in the case of an unforeseen catastrophic event in my home, could potentially be lost for ever!

Companies like BackBlaze offer products for backing up your local machine (and also files stored on a server, like in my case), but I optioned for another setup using Amazon Web Services S3 Glacier!

So what is S3 Glacier? Glacier is an archiving service, where you can upload all you data and pay a very small service fee per month for Amazon to keep your data safe. Amazon S3 Glacier is designed to provide average annual durability of 99.999999999% for an archive. The service redundantly stores data in multiple facilities and on multiple devices within each facility. To increase durability, Amazon S3 Glacier synchronously stores your data across multiple facilities before returning SUCCESS on uploading archives. S3 Glacier performs regular, systematic data integrity checks and is built to be automatically self-healing.

My setup consists of a software running on my local NAS that monitors specific places on the NAS where I can put important files and documents, these are then uploaded to Amazon S3 Glacier.

Putting files into Glacier is actually quite easy and the price for storing your data in Glacier is very modest, it’s when you want to retrieve the files that you might need to pay (it also depends on how much data you want to retrieve and how fast you need your files).

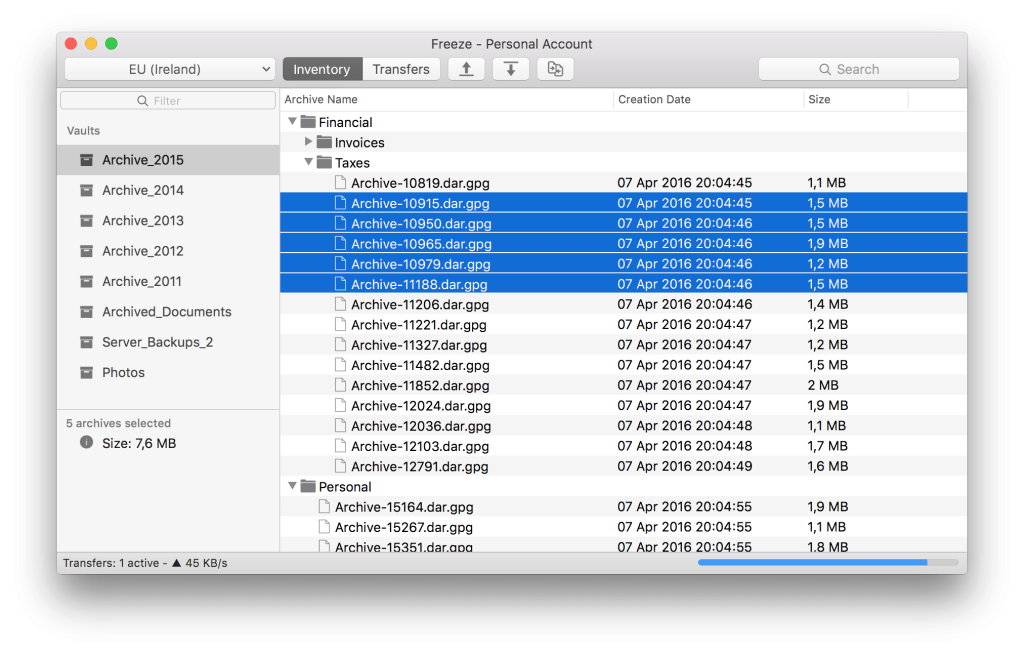
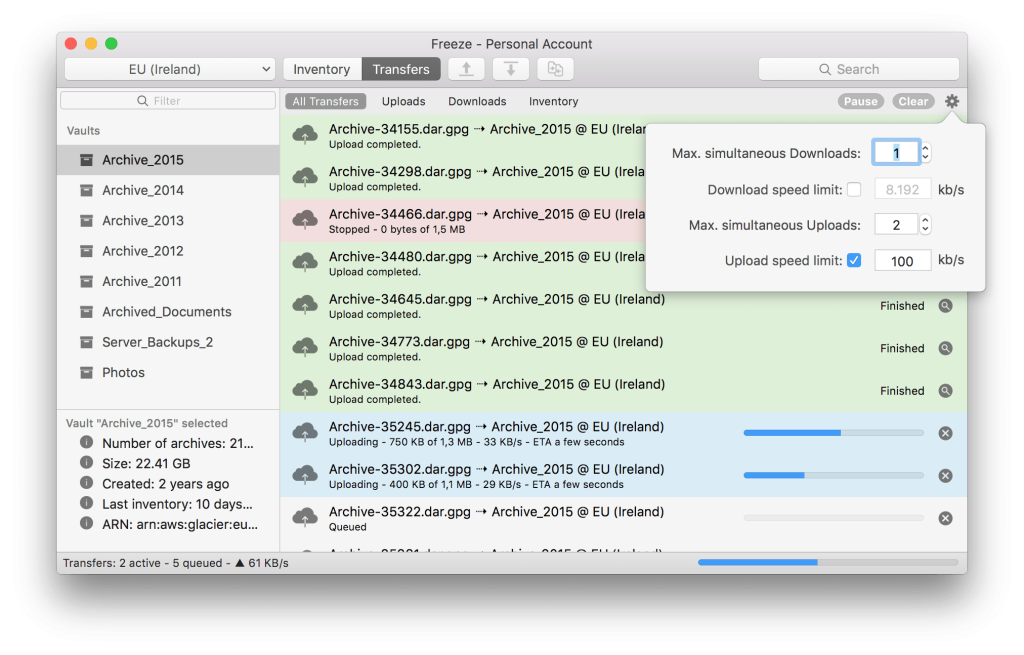
As there is no GUI for exploring AWS Glacier Vaults (where the files are stored), I found a really great application online called Freeze that makes life much easier for anyone who wants to explore their files and retrieve them from a UI. 

So are you in the market for a simple, easy to use and very secure way of storing files, documents, pictures, videos etc. of your beloved ones, and you want to be sure that even if your house burns down you will still have access to those files? Try out AWS Glacier with the Freeze App!

(This is not a payed advertisement, BackBlaze, AWS and Freeze App have not been consulted and/or informed about this blog post)

Best Screen Capture for macOS

The best tool out there that I have found is Skitch.

Whats great with Skitch, is that it’s awesome to capture screenshots and annotate them right in the app and being able to just copy paste the annotated screenshot to any other application, be it Skype for Business, e-mail or Microsoft Teams. It just works, and what’s even better, it includes free synchronisation of screen snaps to Evernote.

So if you ever look for a great screen snap/screen shot utility for macOS, look no further!

(This is not a paid advertisement)

Three finger drag! MacOS Trackpad

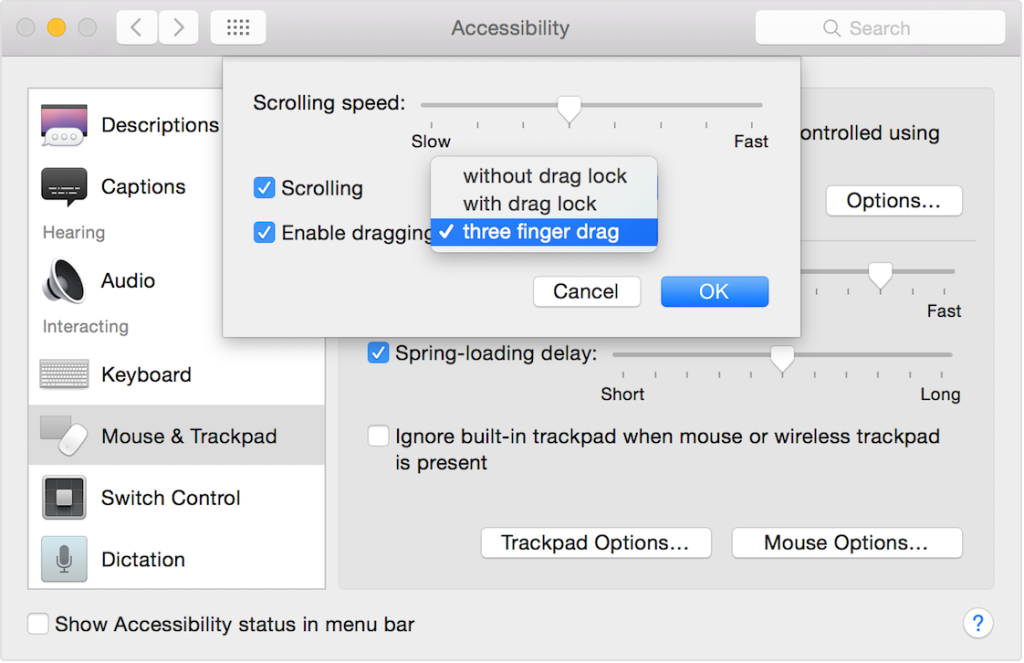
Hi future me (and anyone else who stumbled upon this page), this is how you turned on three finger drag:

Yes I know, you thought it was under “Trackpad” in Preferences, but Apple hide this setting under Accessibility.

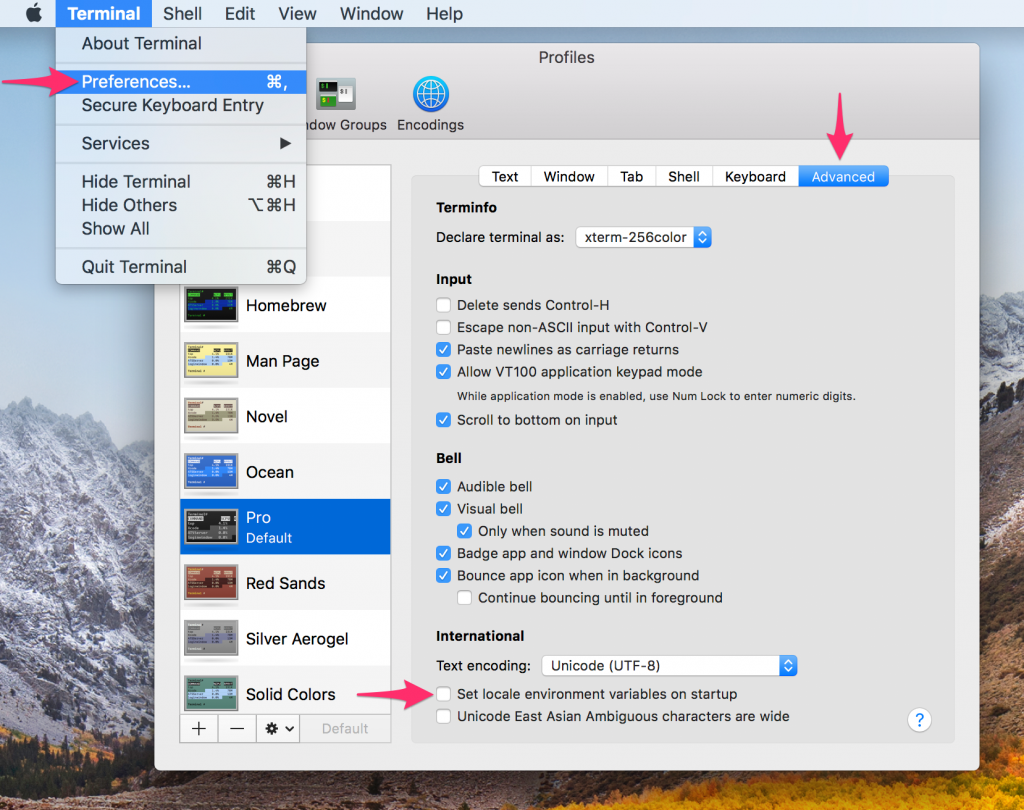
MacOS Terminal UTF-8 Issue

Since I only tend to do this once every time I get a new MacBook, I decided to document the procedure here so I don’t have to google it every time!

  1. Open Terminal
  2. Open Preferences ⌘,
  3. Goto Advanced
  4. Uncheck “Set locale environment variables on startup”

No ports showing in LibreNMS for Fortigate Firewalls

After looking at GitHub for a solution I consulted the very helpful people in #LibreNMS at FreeNode (IRC) and got this solution.

Add this line in you config.php:
$config['os']['fortigate']['empty_ifdescr'] = 1;

And guess what, it works!

Why does LibreNMS behave like this? Well, it’s because LibreNMS assumes that there should be a “ifdescr” in the SNMP answer from the Firewall, while Fortigate has removed this in order to be compliant with an SNMP RFC that says that there should be no ifdescr if there is no description text for the interface. At least that was the information I was able to gather from the conversation on IRC and github/Internet!

Remove all old kernels on your Ubuntu

When you login to your system and /boot is full, don’t panic!

Run this command and lean back, take a cup of coffee and relax, breath!

dpkg -l linux-* | awk '/^ii/{ print $2}' | grep -v -e `uname -r | cut -f1,2 -d"-"` | grep -e [0-9] | xargs sudo apt-get -y purge

When it’s done, it’s a good idéa to:

apt-get update && apt-get upgrade && apt-get dist-upgrade

Once again, lean back, take a cup of coffee, find your inner zen!

Source: http://askubuntu.com/questions/2793/how-do-i-remove-old-kernel-versions-to-clean-up-the-boot-menu

Backup your VPS to Google Drive

If you only have a small amount of data to backup, Google Drive is actually quite a decent alternative, but you will need to install a few tools to you VPS.

With the tool rclone (rsync for cloud), you can upload your files to Google Drive, Amazon S3, Dropbox and a few more. The procedure is almost the same no matter of the cloud provider you go for.

Just goto: http://rclone.org/

Install rclone as described and then setup a cronjob to sync the files that you want to Backup.

My crontab to backup the automysqlbackup folders:

# m h  dom mon dow   command
  0 *   *   *   *    export PATH=$PATH:/home/siho/bin && rclone -q sync /var/lib/automysqlbackup/ remote:Backup/automysqlbackup